what do you need to make a shirt with a cricut
Hi Daydreamer!
Today you will acquire, from starting time to stop, how to make custom T-shirts with your Cricut Maker, and Cricut Explore.
1 of the biggest reasons people, including myself, buy a Cricut is because y'all can make beautiful T-shirts. If you have Cricut and haven't explored this feature nevertheless, I recommend you lot to do information technology. If possible today.
Seriously!
I don't mean to be pushy, but I love all the things you lot can attain with this machine.
On this footstep by step tutorial, nosotros volition be covering the three near important aspects that every custom T-shirt must undergo to have the all-time possible and long-lasting results.
- Uploading the SVG files to Cricut Design Space and touching things up. I volition exist providing yous with two SVG files for y'all to follow along as well.
- The cutting and weeding process. I volition teach you how to arrange the designs on the MAT as well as the all-time practices for weeding, plus how to cut it with either the Cricut Maker, Cricut Explore, or Cricut Joy.
- For transferring the pattern on your T-Shirt, we will be using both a regular iron and the EasyPress 2, then no matter what yous have on manus. I've got you covered.
Tip: if you want to learn everything you need to know near iron-on (HTV) and chief how to use it on different surfaces, make sure to bank check this amazing tutorial I put together.
Make a Custom T-Shirt Step by Step Tutorial
Earlier we get our easily on this project, I desire to explain to you how this tutorial will unfold (I don't want you lot to become confused).
There are two SVG files that we will be using:
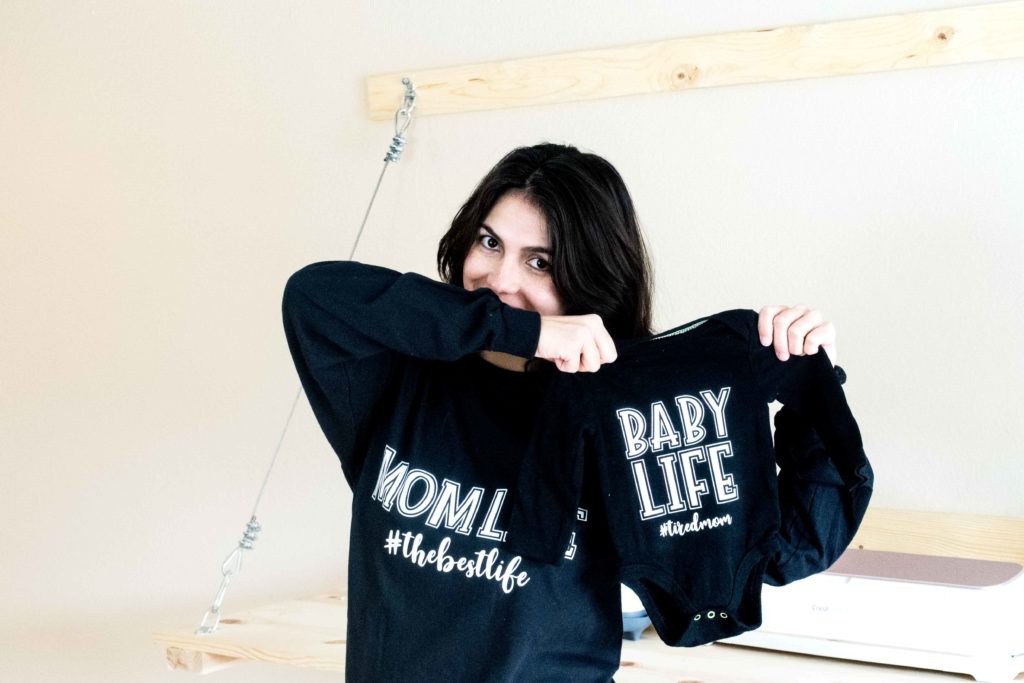
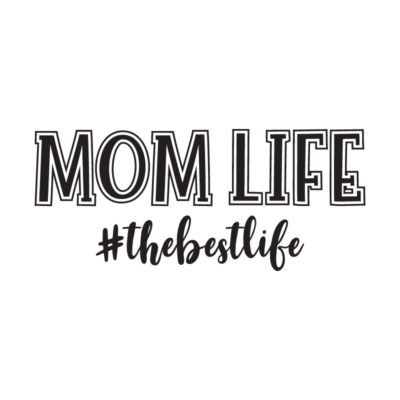
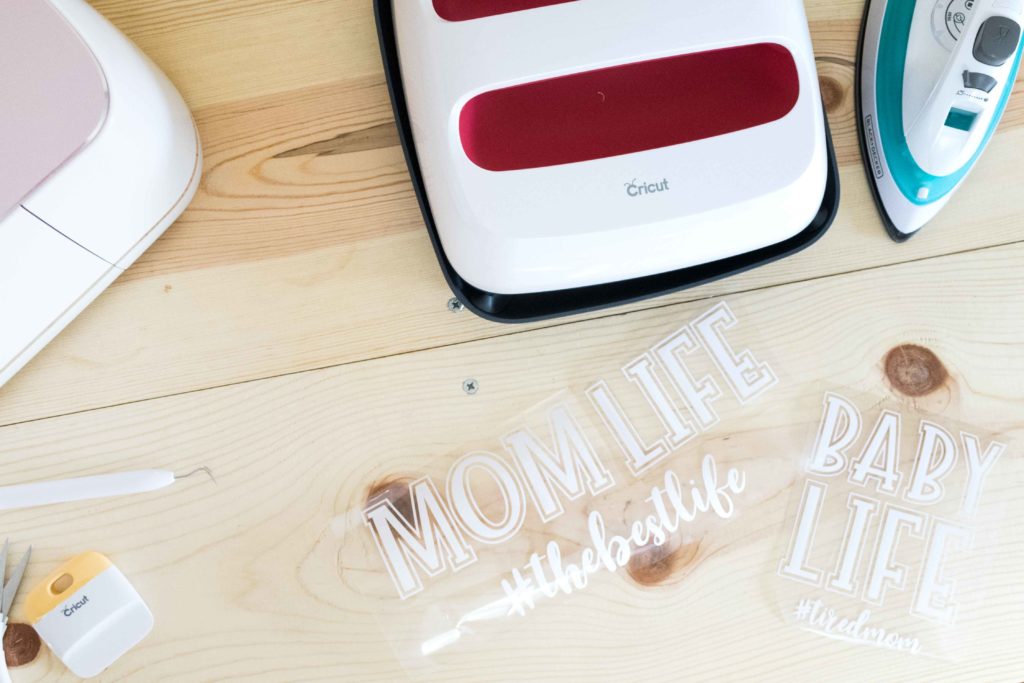
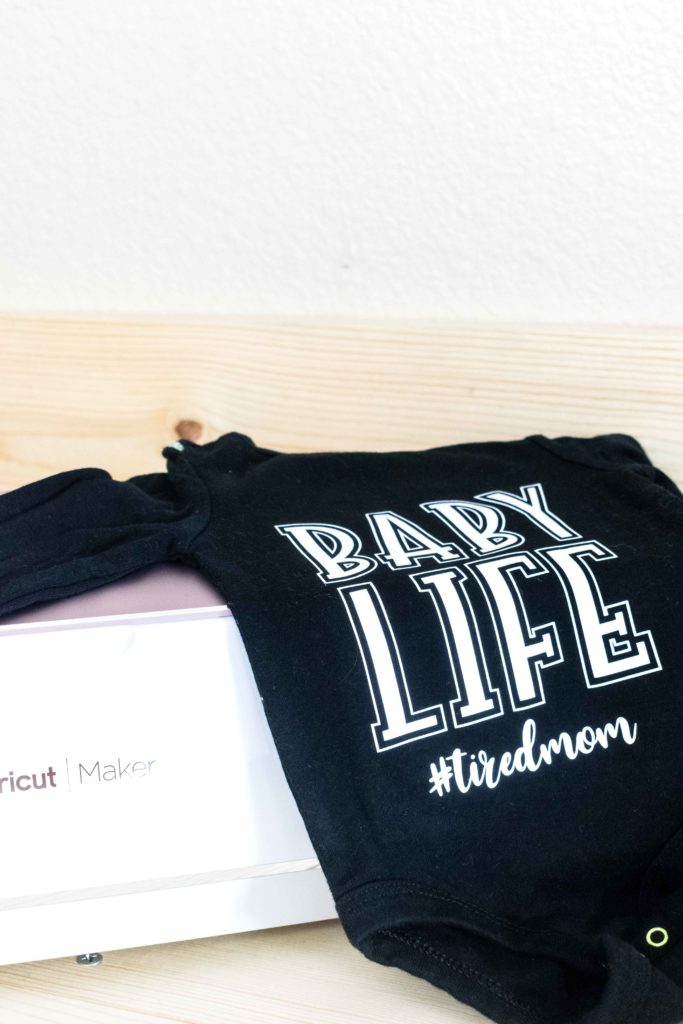
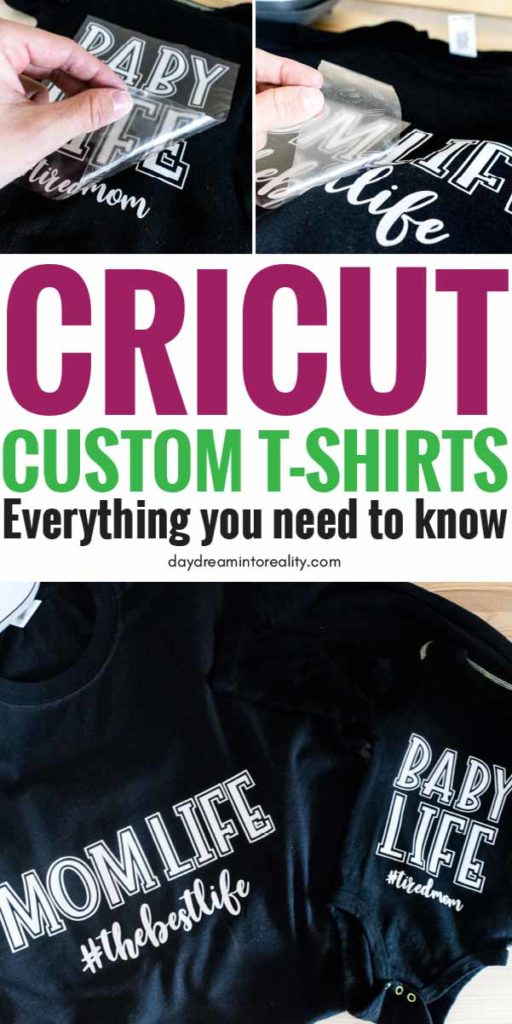
- MOM LIFE #thebestlife
- BABY LIFE #tiredmom
Here'south the thing. Since both files are very like, I will simply explain the Cricut Design Space cut and weeding steps with the first file MOM LIFE #thebestlife.
However, for the transfer procedure, I volition be using both designs. For the "MOM LIFE" file, I will be using the EasyPress 2. And for the "BABY LIFE" file, I volition exist using my household iron.
With that said, let's go started!
Download the files to follow forth!


To download the files, you NEED to be on a desktop or laptop, and you lot must click on the push to trigger a download file on your pc.
Depending on your browser settings, sometimes your PC will enquire where to save the file, although, almost times, the files will exist in your download binder.
If the image opens in a new window (this may happen because of your browser settings), correct-click on it, select the option "Save Epitome Equally," and choose where you lot desire to save the file.
SVG files look similar a spider web page file when you download them.
Make sure to follow me onInstagram and tag me so I tin see all of your creations! (I'd love to meet you over there).
Oh!
And but so you know, I also have a library full of costless SVG files and Printables for all of my subscribers, a.k.a Daydreamers. You tin can meet a preview right here or get access past filling out this form.
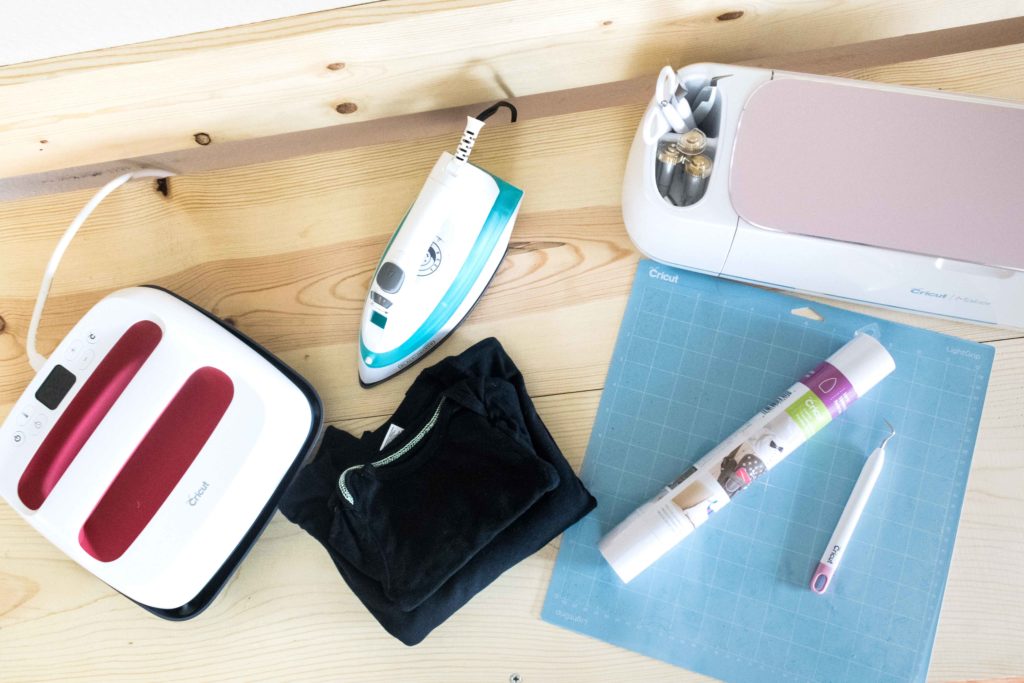
Materials
The materials for this project are very simple. Hither is a list of everything I used:
- Long Sleeve Blackness T-shirt & Blackness Babysuir (or any T-shirt y'all have on hand)
- White Iron On or Heat Transfer Vinyl (HTV)
- Whatever of the Cricut Explore Machines or Cricut Maker
- Fine Indicate Blade & Low-cal Grip Mat (Standard Mat works great besides)
- Weeding Tools
- Regular Household Iron Or EasyPress ii
- Parchment Newspaper if using a household fe.
- Easypress Mat or small towel
Cricut Pattern Space Steps
Once you take downloaded the SVG files I provided at the beginning of this tutorial, go ahead and log in on your Cricut Pattern Space.
If you are a beginner and are still figuring out Cricut's software, I recommend that you read my fantastic andUltimate Cricut Blueprint Space tutorial.
At present let'southward have some fun!
ane. Upload your Files & Weld
Subsequently saving your file on your computer, go ahead on and click on the upload selection located on the left console of the sheet area.
As y'all can run across in the screenshot below, y'all can at present upload an image and pattern. Go ahead and click on the "Upload Image" push button and select the SVG file from your estimator. Subsequently you do that, the image will appear on recently uploaded images.
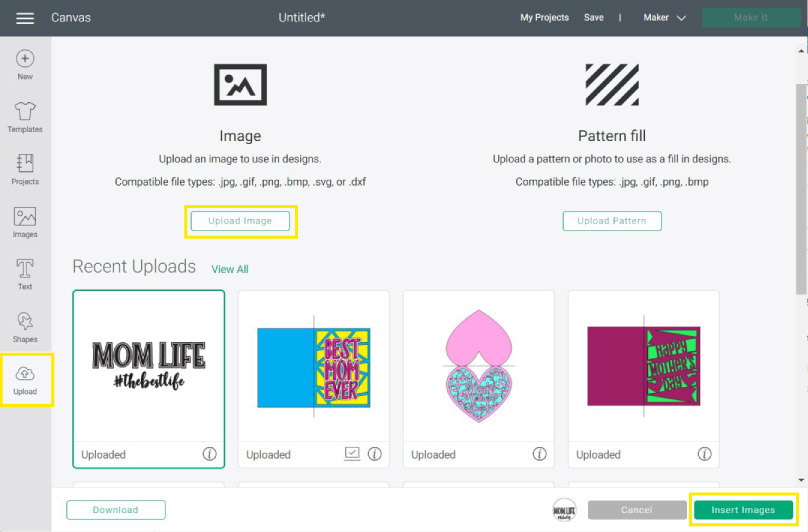
Select the uploaded "MOM LIFE" SVG and so click on insert images.
Later on clicking on insert images, the file will show up inside the Design Infinite Canvas area.
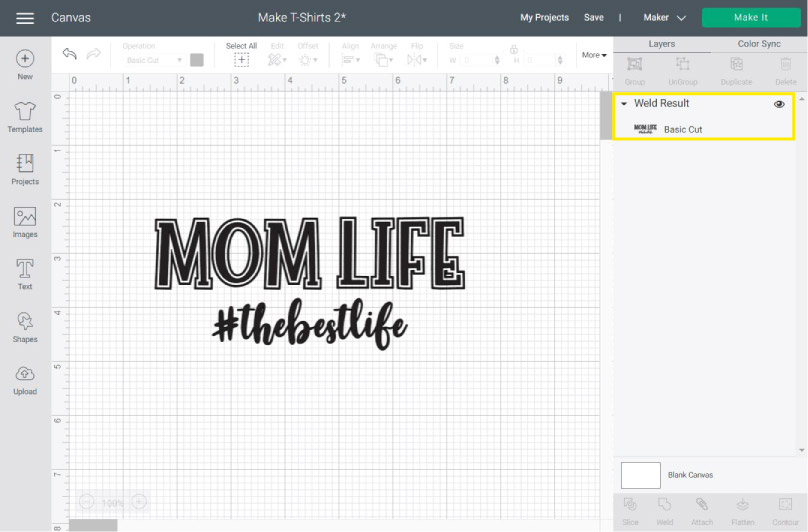
As yous can meet, on the Layers Panel, the design is in multiple layers. Before we proceed, let's organize this file. Select the file on the sail area and click on "Weld," located at the Layers panel'south lesser.
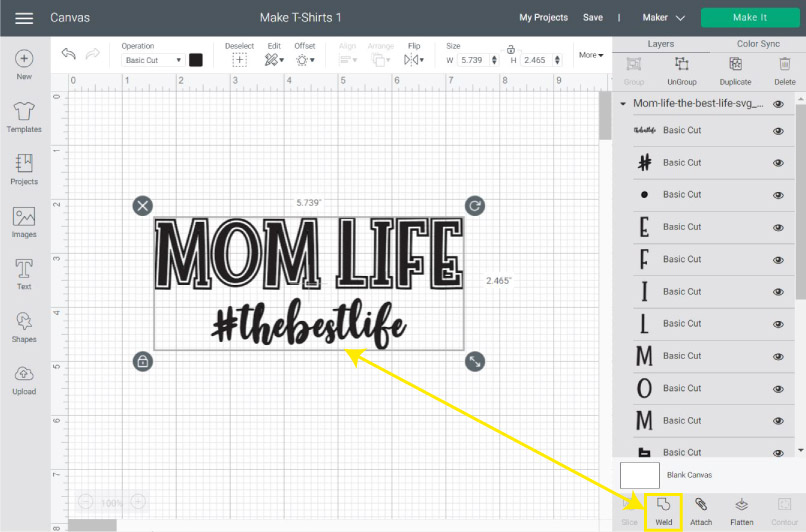
At present, the design is in unmarried layer and ready to get.
ii. Using Templates to Resize your Design
One of my favorite things to practice when I am making a T-shirt design is to employ templates. This pick takes so much pressure off my shoulders, and information technology gives me the peace of mind to know how my design will look on my T-shirt!
Here is how yous do it!
On the left console of the canvass area, there is an icon chosen templates. When you click on templates, you will explore all of the surfaces available for you to visualize your design.
If y'all accept more than doubts almost templates, make sure to read my complete guide on how to use them.
Y'all can look for a item template past typing a keyword. I typed in "T-shirt" and I got a wide multifariousness of options.
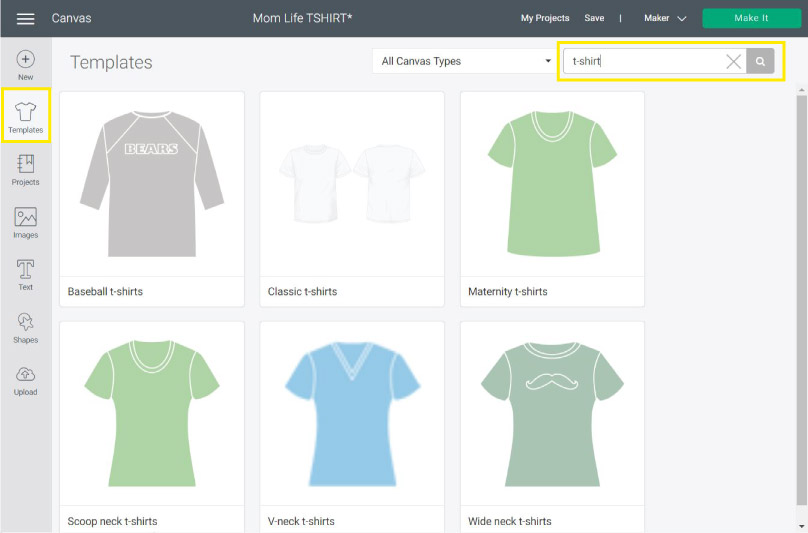
Sometimes you may not find the exact template you need, just don't let that terminate yous.
For example, there was no template for the long sleeve t-shirt I bought for this projection. Therefore, I used the "Classic T-shirt" and changed the size to pocket-size and the color for black because that's what I was going to utilise.
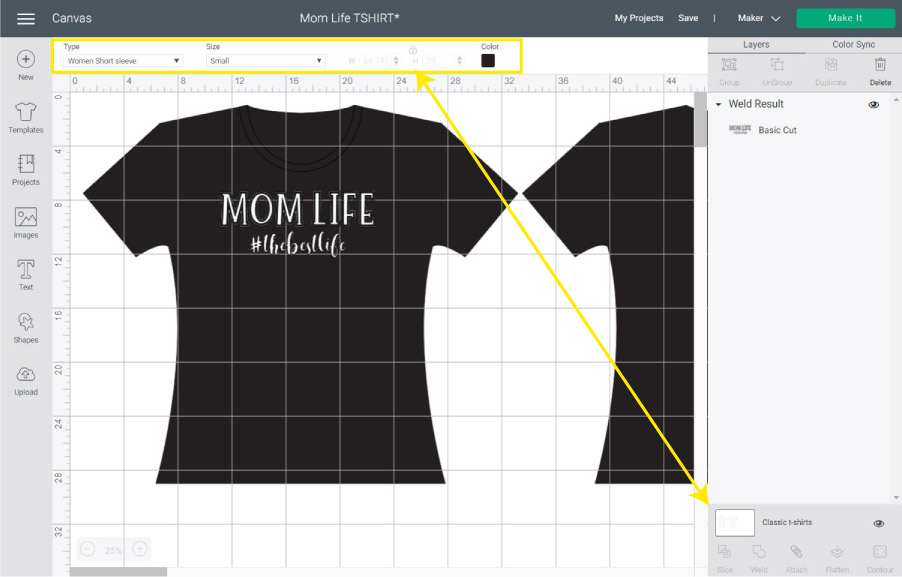
If yous don't trust the template size because, let's face up it, there are many brands, and you want to make certain you lot size your project 100% correct, you can alter the measurement of your t-shirt template.
On the Layers Console, click on the "Classic t-shirt" thumbnail, and then on the top menu, under the "Size" drop-down menu, select the pick "Custom," and type in the exact measurement of your t-shirt. (You may need to unlock the proportions.
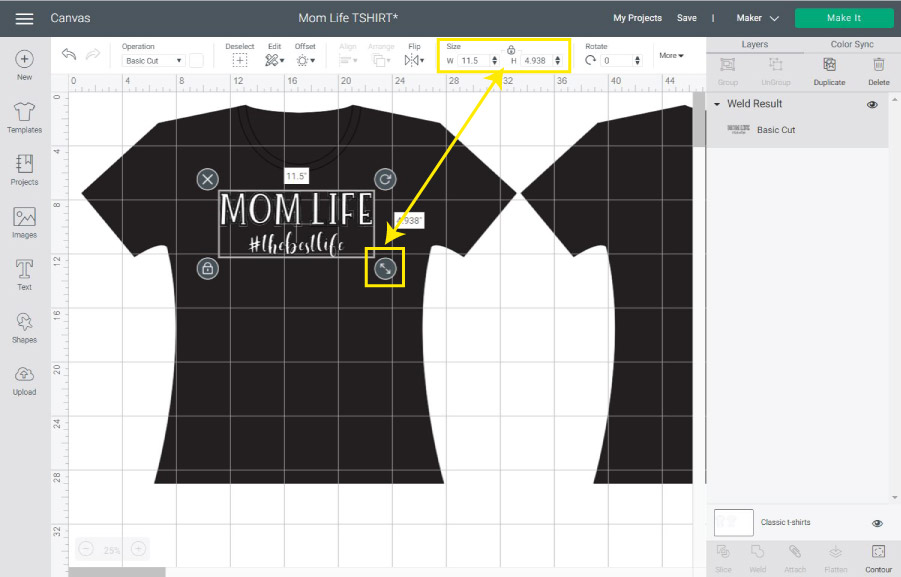
Information technology'south fourth dimension to resize your projection.
Select the design on the canvas and drag information technology by the bottom-right corner until it fits the template. Keep in heed the cutting limits of your machine.
For the Cricut Maker and Cricut Explore, your design tin can be 11.five ten 11.5 inches if using a 12×12 cutting mat. or 11.5 x 23.5 inches if using a 12×24 mat.
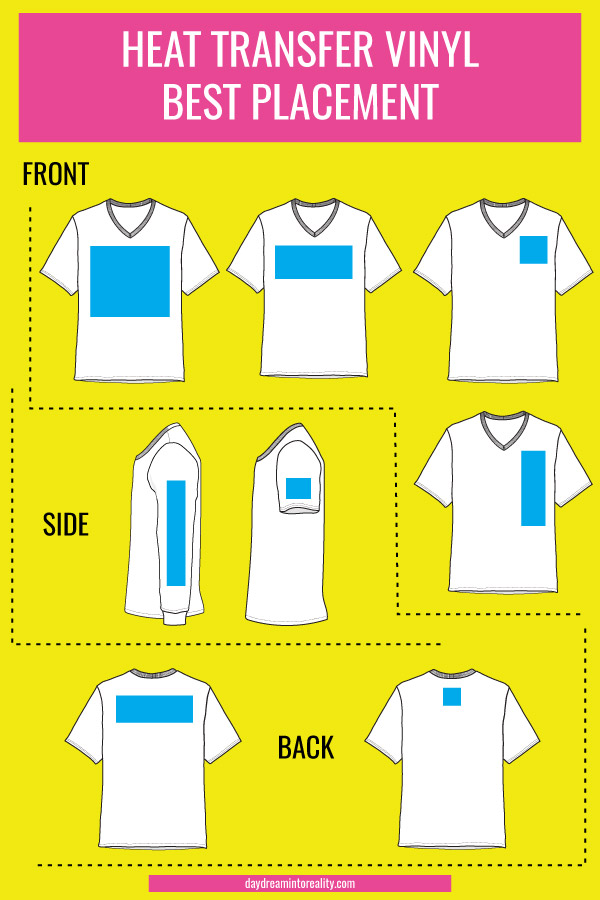
I've also included a squeamish graphic to help y'all size your design based the best placements for iron-on.
One time you weld, resize, and you are happy with the way your design looks, click on "Make it" to ship your design to your car.
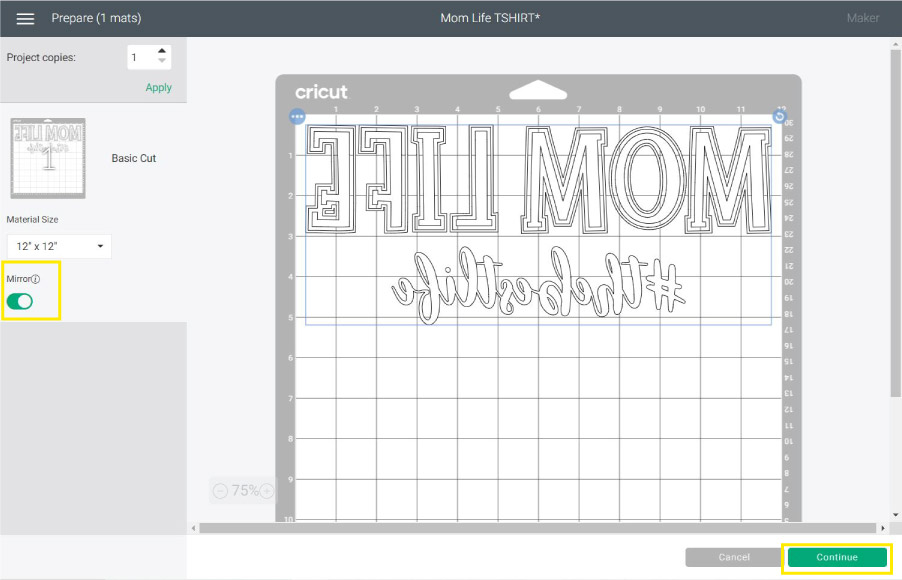
2. Make it – Mirror On Prototype
Nosotros are getting closer to completing our project!
After clicking on "Make information technology," you will be prompted to connect your car and follow the cut process.
Withal, for Iron-on or HTV projects, it is crucial (EXTREMELY) that you turn on the Mirror Option located on the left panel expanse.
The reason you need to do this is that when you cut this blazon of material (Iron on), you lot are cutting it upside down. Therefore if yous forget this vital footstep – as I take in the past – your design will look backwards on the transferring procedure.
Not fun at all!
Right?
3. Select Materials:
At this point, all of the steps, I just explained, will work with any of the Explore family machines or the Cricut Maker.
At present, since I want y'all to be able to create this project no thing what type of machine you have, let me show you the fiddling differences you lot volition see on each motorcar.
Cricut Maker Instructions: select the material by browsing all of the materials Cricut has to offering. I already had mine marked a favorite, and so I was able to pick it from hither.
Cricut Explore Air two – Instructions: If you use everyday iron-on, you can move the smart set dial to the iron-on setting. However, my favorite thing to exercise whenever I utilise my explore machine is to e'er have the dial on custom and choice the textile from "Design Space."
Cricut has so many types of of iron-on and they vary a lot and using "iron-on" may not work if you use the dial.
Cutting and Weeding – Best Practices
Finally!
It's cut time.
We are using the lite-grip bluish mat considering vinyl is a very thin and light fabric. If you want to larn more than well-nigh all of the mat differences, cheque out my great guide!
You can also utilize a green mat as well.
-
Step 1 -
Step ii -

Pace iii


To cut your design to perfection follow the next steps:
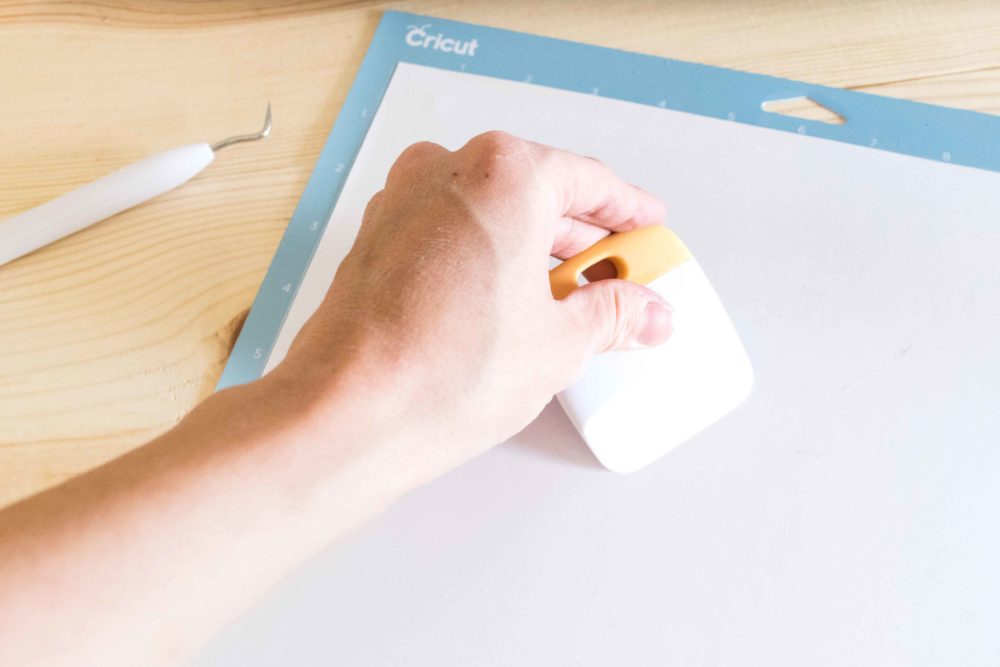
Step ane: Place Iron-on vinyl on your mat pretty/shiny side down; this is very important. If you identify information technology the other style, you will not cut the vinyl, but the transparent material that it is adhered to.
If the textile seems to have bubbling, you can gently utilise the scraper to smooth out the vinyl on the mat.
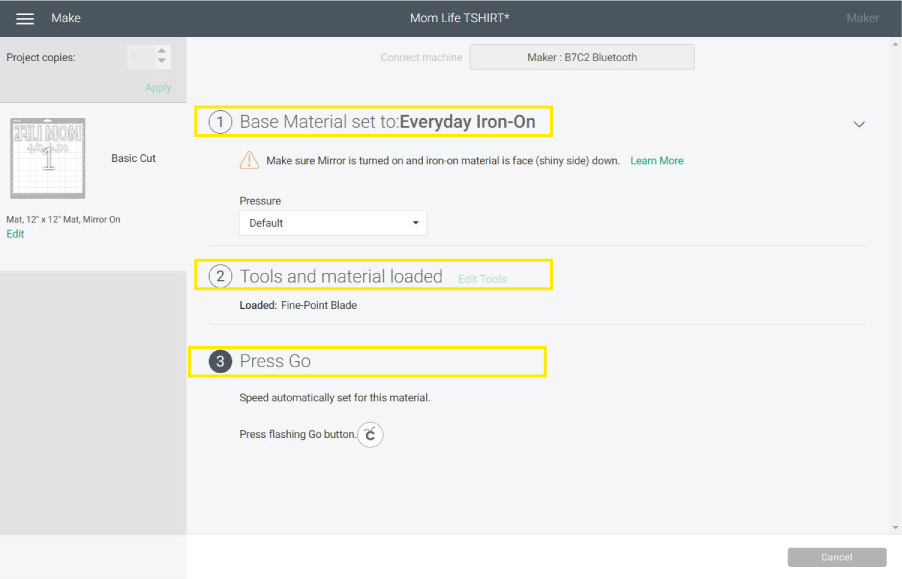
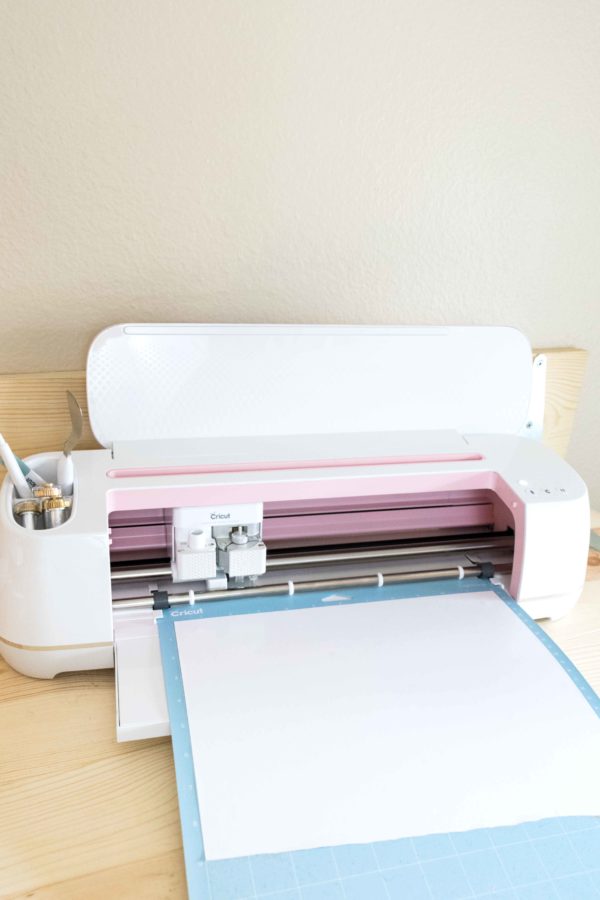
Step ii: Install the fine bespeak blade and load your mat into the Cricut past borer the trivial arrow on your Cricut Auto. After y'all are done with this, become ahead and press the Cricut's logo button and see the magic happen.
Cricut Design Space will inform y'all when your blueprint is 100% cut. When this happens, unload the mat to weed out the file.
Stride 3: Remove all of the negative parts of your design. I recommend that you open the epitome once more to brand sure you cut out the right negative pieces.
I wish I had followed this advice! I removed the "LIFE" role of the file the wrong way, and I had to cut it again. Then, take your time and enjoy the process.
I find weeding so relaxing!
Transfer Vinyl to T-Shirt
The moment of truth!
After doing all the steps in Design Infinite (cutting and weeding), we can now transfer our beautiful blueprint to our T-Shirt.
Yas!
Do you remember I said I would use the "Infant LIFE" file at the terminate of this tutorial? For this part, I will be using a standard household iron and the EasyPress two.
As well, something to keep in heed and is worth mentioning is that Cricut recommends you prewash your items without whatsoever fabric softener before y'all press them.
However, since I can be a little rebellious sometimes, I went online to see other opinions on forums. And I found that people utilize them on new article of clothing too, and never have any issues.
And then it's upwards to you. In the future, I will plan on comparing how this affects after washing. In the meantime, follow Cricut's recommendations.
Permit's become started.
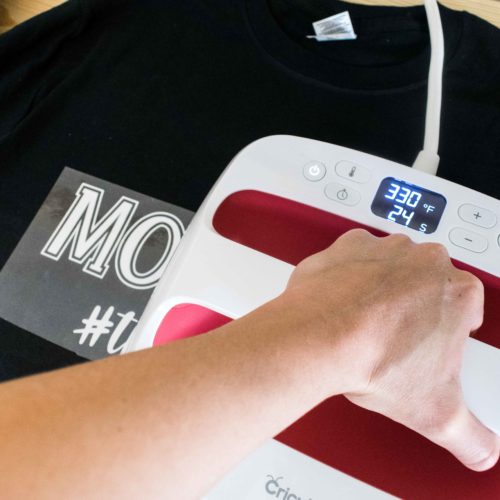
Transfer Iron On with EasyPress two
These instructions also work with the start version of the EasyPress. So y'all tin use that one also.
The temperature that Cricut recommends for everyday Iron-on as a material and cotton as a base is 330 °F then go ahead and preheat your EasyPress.
f you take other base material or another blazon of vinyl similar foil or glitter, make sure to cheque Cricut'due south guide, for most optimal results.
Check out the next gallery and permit's conversation about each step.
-

Pace 1 -
Step 2 -
Step 3
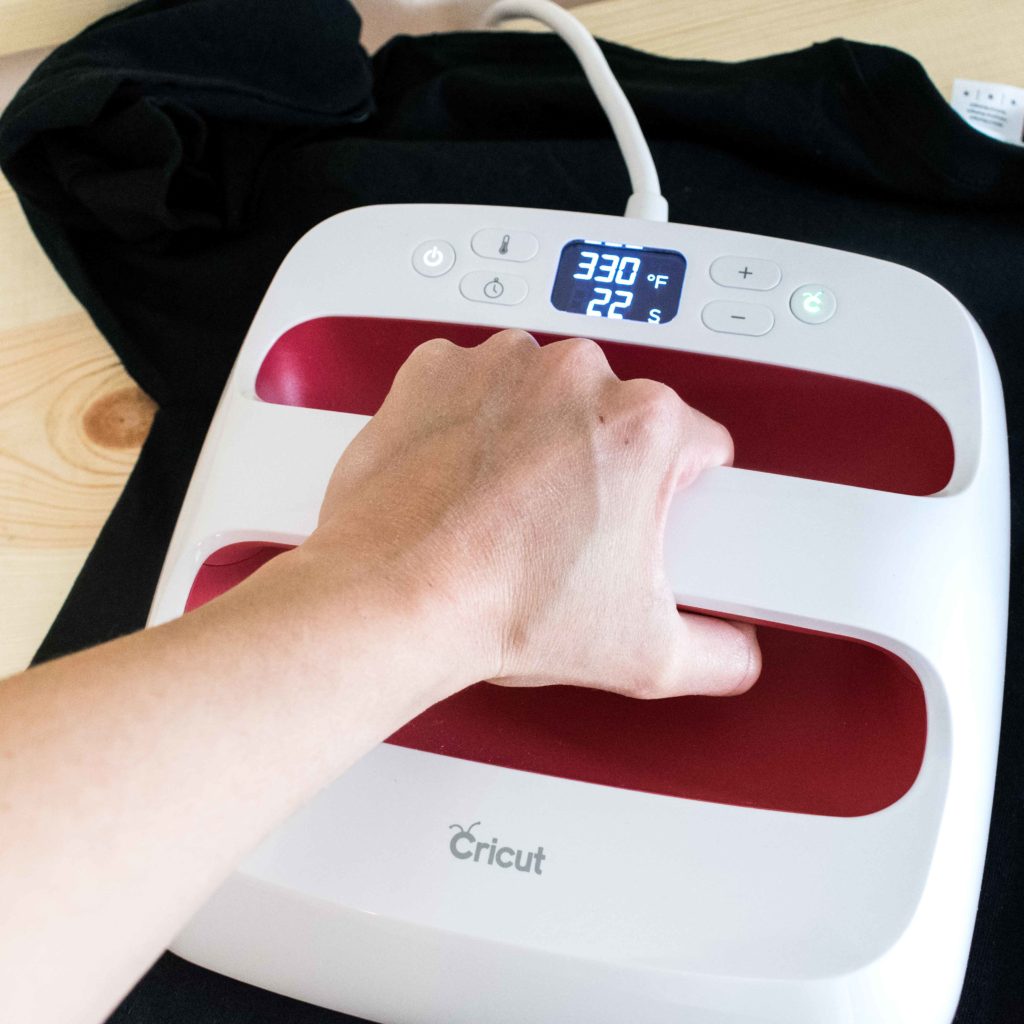
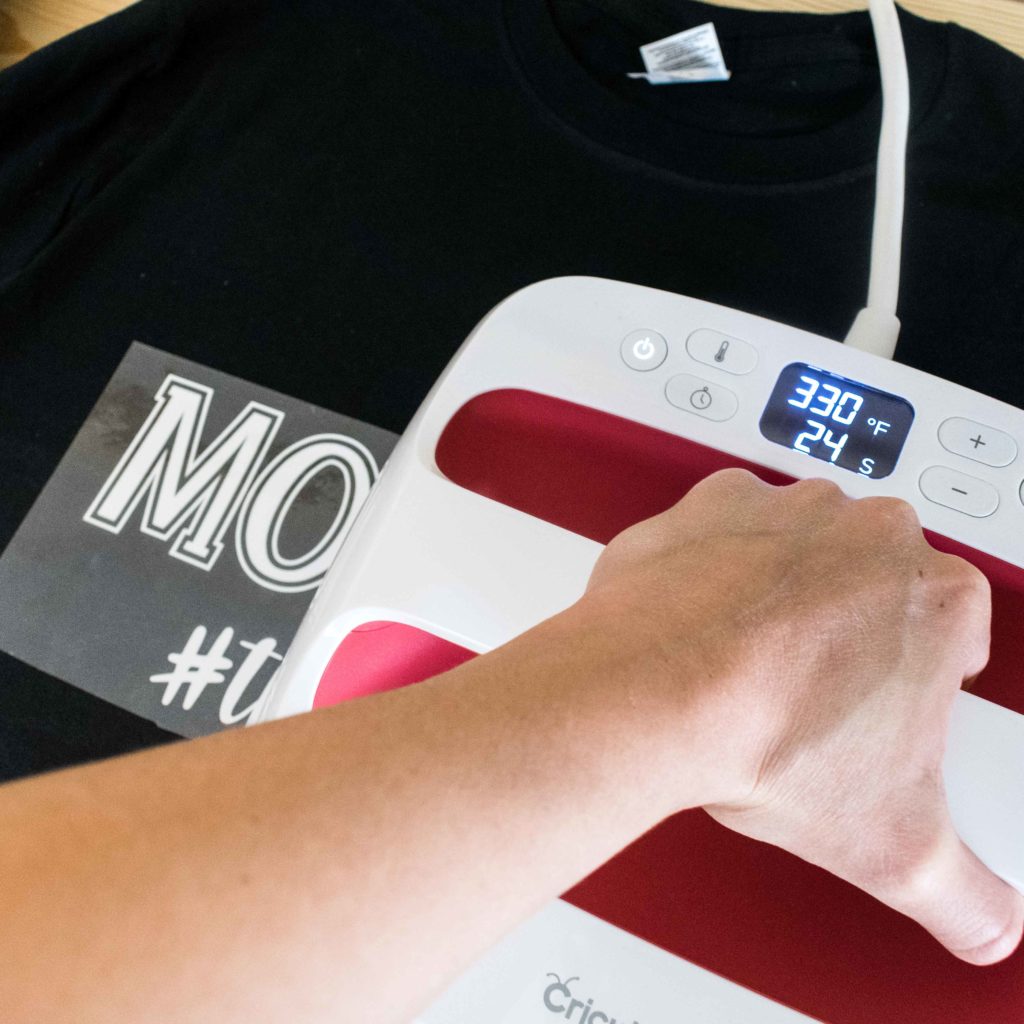

Step 1: Once your EasyPress is preheated, get rid of some of the wrinkles and press for about 5 seconds on the surface area, you programme to transfer your design.
Footstep ii: Gently apply pressure for thirty seconds on your design. As you tin run across, I take the medium-sized press; and since this design was larger than the EasyPress, some areas had to exist overlapped.
I pressed for thirty seconds on each side; this is ok for the regular Iron-On, then don't worry about it. However, if you are working with foil Iron-on endeavour, not to overlap whatever areas every bit this material is quite delicate.
After y'all are done with pressing, turn the T-shirt effectually and printing for about fifteen seconds on the back to finish up the process.
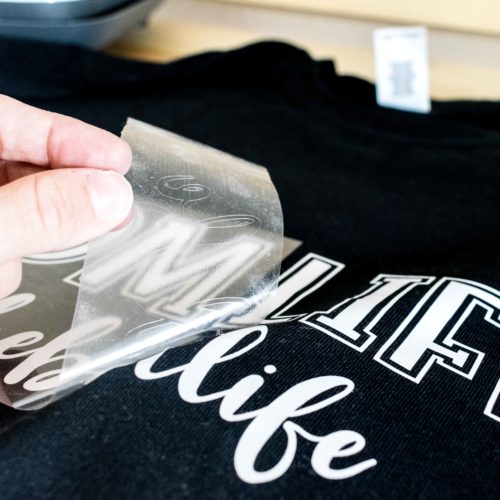
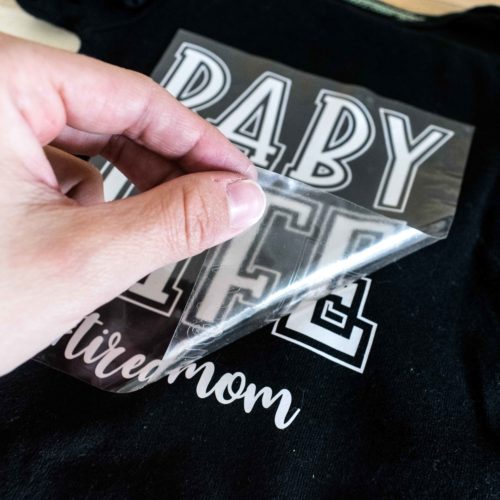
Footstep 3: Wait a little fleck until the design has cooled off enough, and and then pare information technology off while it is still warm to the bear upon.
Learning Experience: If you take the EasyPress Mat, I recommend you to use it, equally it allows you to printing the garment deeper against the heat, compared to using a business firm surface every bit I did.
If you don't have it, use a towel between or underneath your T-shirt. Information technology works merely as well!
Since I didn't employ the EasyPress with a towel or mat, I had to press the front another couple of times.
You've been warned!
Transfer Atomic number 26 On with Regular Household Atomic number 26
Finally, and for the Showtime Time, I had success with my household Iron! Every single time was just a disaster.
No matter how many tips I saw online, nothing worked until it clicked! What if I use a towel as Cricut Recommends with the EasyPress? The issue was mind-blowing.
The thing that I don't like about the Household Iron is that sometimes you do need specific temperatures for different types of materials. Though this worked like a charm for the first time for me, I have to admit that I withal love my EasyPress 2.
Acquire more nearly EasyPress 2
-

Stride 1 -

Step two -

Step three
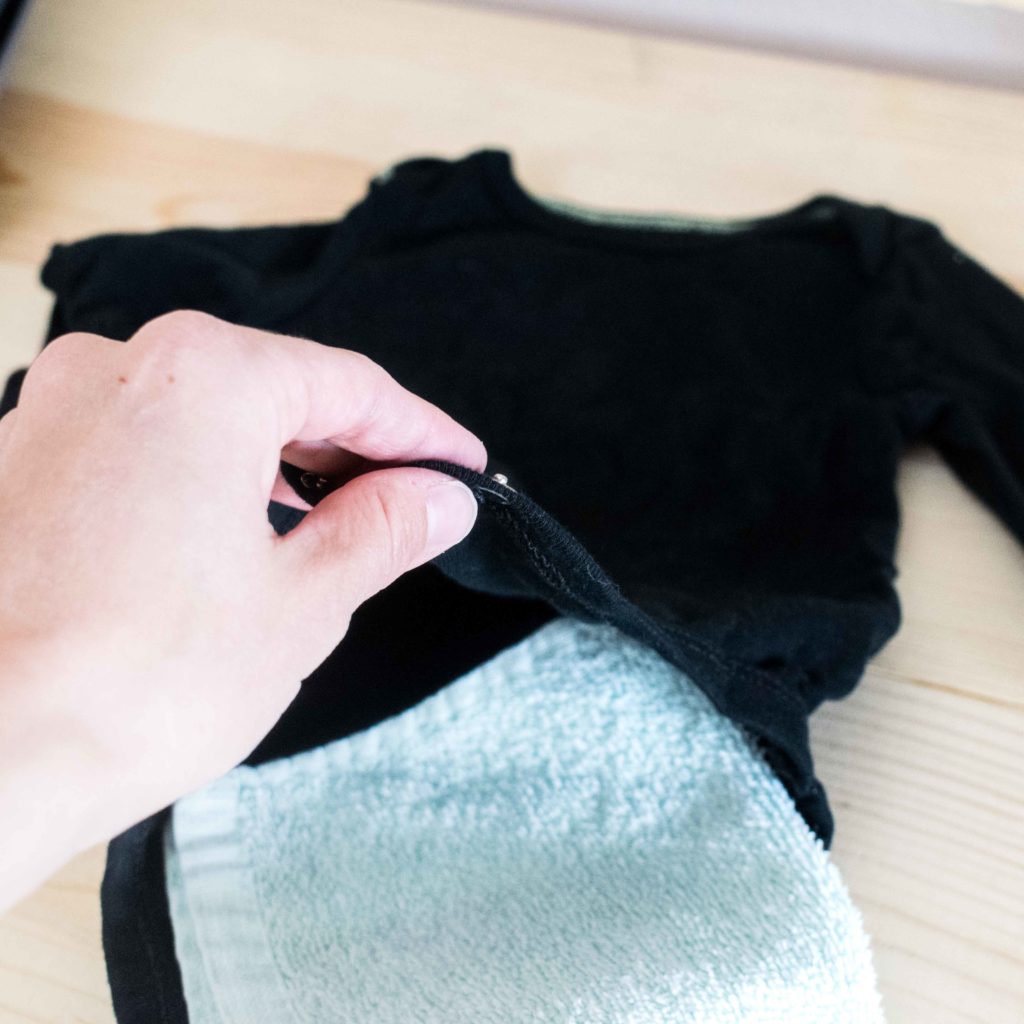
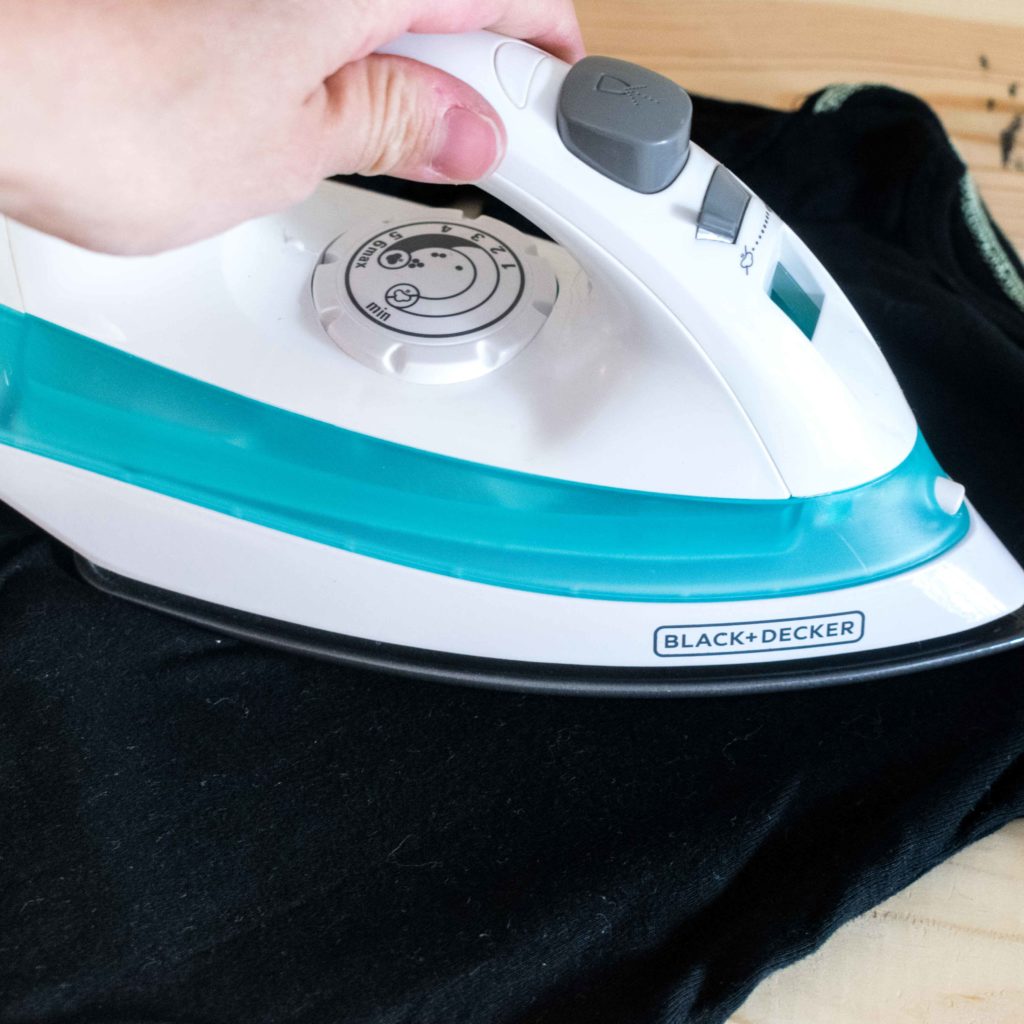
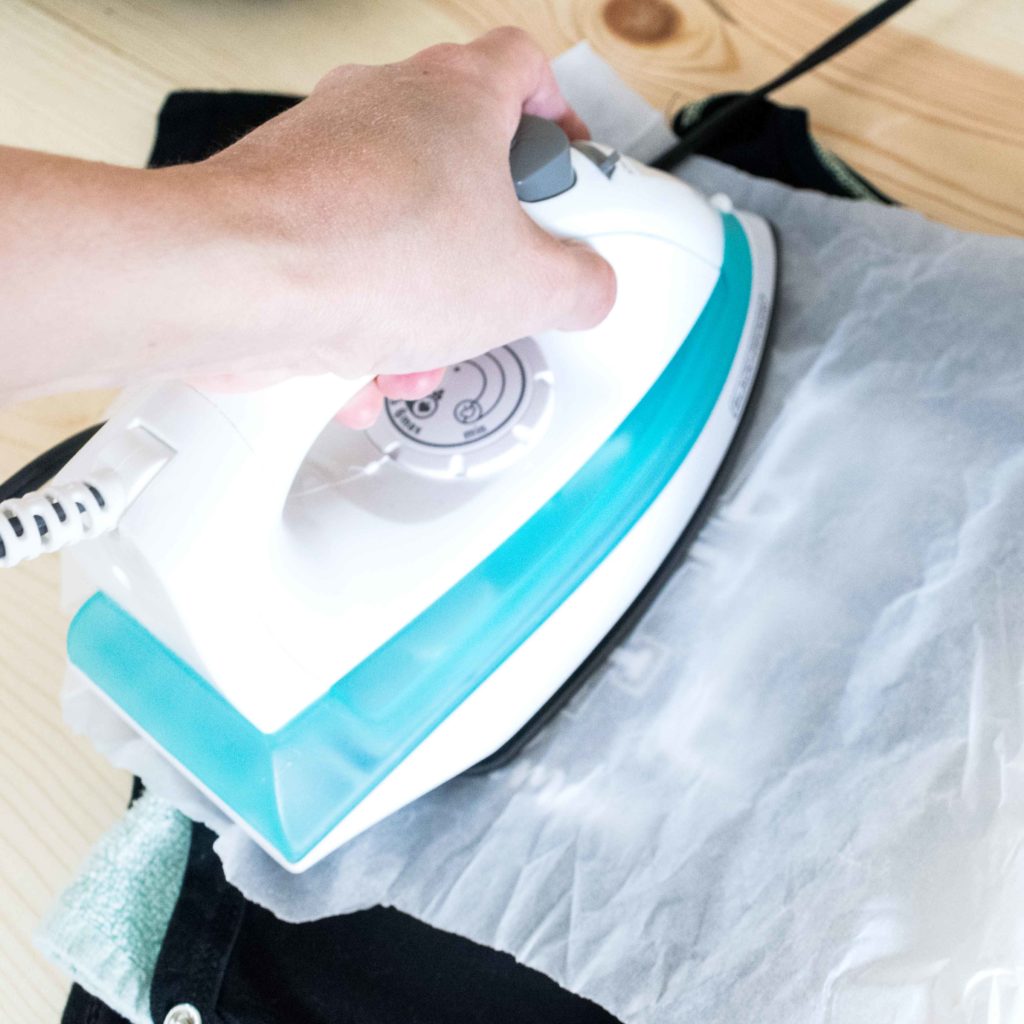
Stride 1: Preheat your Regular Iron to the max heat. In the concurrently, place a towel within the onesie. You lot need to brand sure information technology's polish and even across the area that you plan to iron your pattern.
Footstep 2: Get rid of wrinkles and press for virtually 5 seconds wherever you want your design to be located.
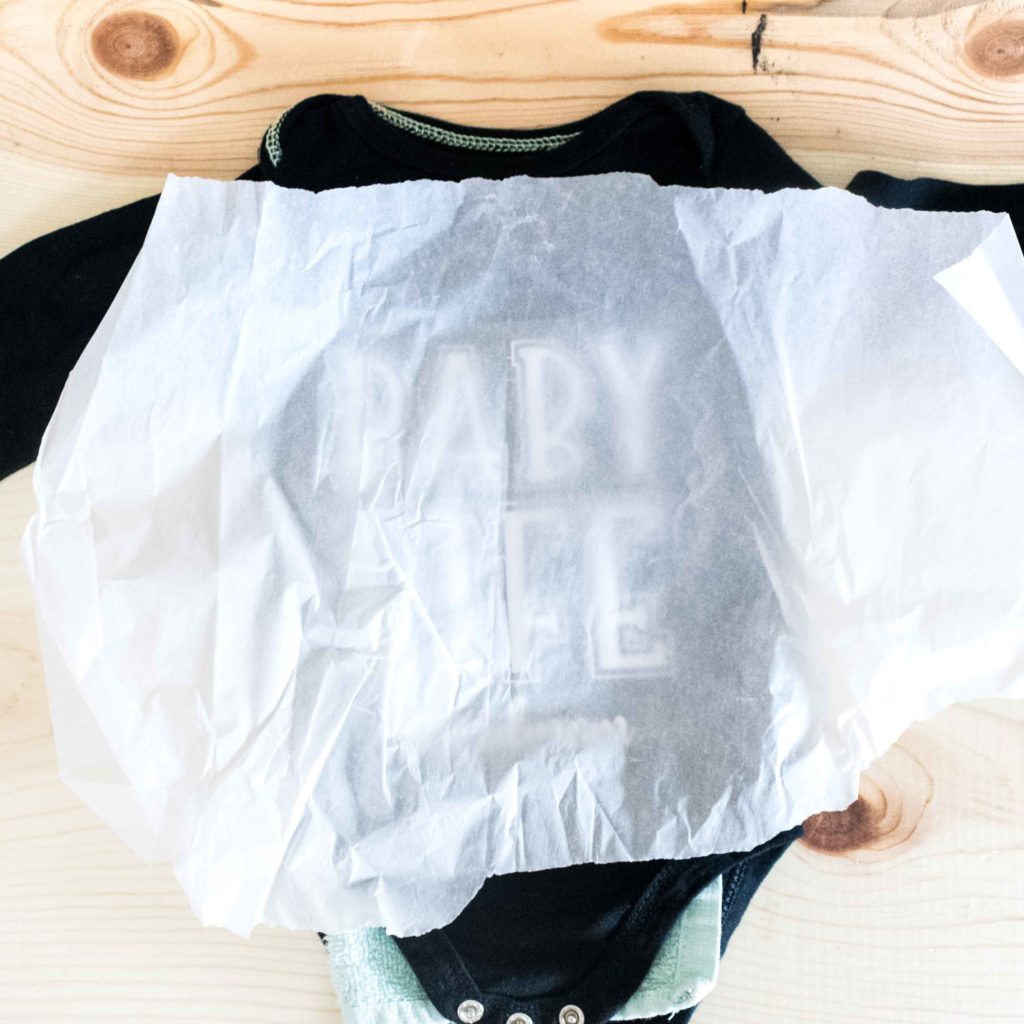
Step 3: Identify your design and cover information technology with a thin cloth or with parchment paper (my favorite).
-

Step 4 -
Step 5

The reason why I used the parchment paper here and not with the EasyPress is that usually, you lot will crave more oestrus presses with the regular Fe. So, if you betrayal your T-Shirt for that long, you volition burn down your wear.
Information technology has happened to me, and it can happen to you!
Stride iv: Medium press for about thirty seconds on half of the design in a vertical way; then press for another xxx seconds on the right side. After pressing vertically, press horizontally on the summit one-half of the pattern for xxx seconds, then the elevation lesser for some other 30.
Plough around the T-shirt and medium press the back of the onesie (with the parchment newspaper on acme) for well-nigh thirty seconds.
Footstep 5: Wait a lilliputian chip until the design has cooled off enough, merely peel it off while it is nonetheless warm to the touch.

Note: Ever allow 24 hours earlier yous wash your brand new T-Shirt. Cricut recommends you dry within out. However, I follow the garment washing and drying instructions of the base garment I used. Never Bleach!
T-Shirt Making Overview
Materials
- Iron On or HTV
- Black Long Sleeve T-Shirt
- Parchment Newspaper
- Small Towel
Tools
- Cricut Maker or Cricut Explore
- Cricut EasyPress (Optional)
- Regular Iron
- Weeder and Scraper
Instructions
- Upload Design to Cricut Blueprint Infinite
- Weld, resize and Go far with Mirror ON* and follow Cutting Instructions
- Load Mat with Iron-On cloth pretty side downward** and Fine Indicate Blade
- Remove from Mat and weed blueprint
- Transfer to your T-shirt*** and peal when the bankroll is all the same warm to the touch.
- Wait 24 hours before washing. Don't use bleach
Notes
*Always make sure to turn Mirror ON when working with HTV; If not, once cut, your pattern will be backwards.
** Retrieve to place Fe On or HTV pretty or Shiny side downwards.
*** If using a regular Atomic number 26, oestrus to max temperature and cover design with parchment paper to protect garment. Apply towel to press confronting the T-Shirt and the Iron.
If using the EasyPress 2, preheat to 330 °F and press for 30 seconds in front, and then printing for 15 seconds on the back. Employ Towel or Easypress Mat to press against T-shirt and EasyPress.
Congrats – Y'all are a Pro at making T-shirts with your Cricut
I hope this tutorial was very useful for you lot. I would honey to come across your creations.
Practice y'all know that it takes me over 25 hours of piece of work to complete a single Cricut article? I know, it'due south crazy! Only I like to make sure that you understand EVERYTHING!
I would capeesh your back up on Instagram / Pinterest / YouTube / as I am trying to grow my audience to keep producing great content!
Source: https://www.daydreamintoreality.com/custom-tshirts-cricut-maker-explore/